
 Search Here
MISC
Parts List
Robot Forum
Chat
Member Pages
Axon MCU
Robot Books
Shop
Contact
SKILLS
How To Build
A Robot
Tutorial
Calculators
Mechanics
Programming
Miscellaneous
Robots
Space
HARDWARE
Actuators
Batteries
Electronics
Materials
Microcontrollers
Sensors
SCIENCE
Robot Journals
Robot Theory
Conferences

The Bootloader
Part #1: Installing Software
Part #2: Setting up Hardware
Part #3: Using the Bootloader
This tutorial will show you how to upload programs to your Axon using a bootloader.
note: If you are using Linux or Mac, please see the FAQ
note: Your system must be 32-bit to use the bootloader (if you don't, use a virtual machine, or a hardware programmer).
note: If you already own a hardware programmer, using the bootloader is optional. Simply plug in the ISP header and program the Axon II directly. The bootloader is just there to save you the $36 of buying a hardware programmer. The hardware programmer will overwrite the bootloader - but you can always reupload the bootloader again later.
note: The following demonstrates how to use the GUI version of fboot. If you prefer to use the classic command line version, see the old fboot setup tutorial. It will also show you where to download source for it, and a tutorial on how to modify it.
note: Thanks to catalinene33 for making the GUI!
STEP 1: Download Bootloader GUI Download and install the .exe into the same folder that you have your compiled robot code.
32 bit Windows:
-
FBOOT GUI (300kb)
Unzip, and run the program.
64 bit Windows:
Linux and Mac:
-
It is highly recommended to use a Windows 32 bit VR machine, but you may also try
this bootloader.
STEP 2: Select Options
Select baud rate.
115200 is your desired baud. The bootloader
has an 'autobaud' feature, so it's likely to work under most baud settings.
Try slower rates if it has problems on your system.
Select com port.
c1 is your Axon II USB COM port (c1, c2, c3, etc) as shown in your
Device Manager (see step 3).
The bootloader only allows c1 to c4.
Select .hex file.
'file' is the name of your program you want uploaded.
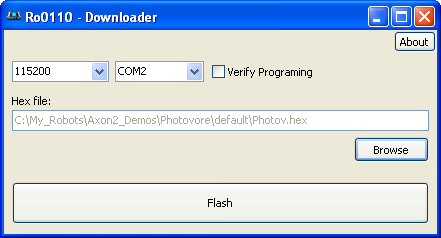
STEP 3: Run Bootloader
Make sure your Axon USB is plugged in, and power turned off.
Press Flash, and a new command prompt window will open with a \ symbol spinning.

Turn your Axon on, and the command prompt window should then look something like this:
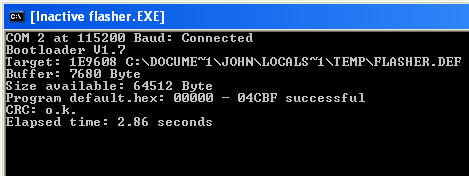
To use the GUI again, just exit the command prompt window.
note: Remember, the bootloader must always be activated BEFORE you turn on the Axon or it will not work.
note: if it takes more than about ~8 seconds to load your code, please see the FAQ on how to speed up your bootloader.
It didn't work? Read the bootloader debugging checklist.
STEP 4: Be Happy!
Congrats, you just programmed your Axon II successfully!
The next step would be to write your own code. Refer back to STEP 4: Setup Project with Project Designer for programming help.
If you want free webspace to post your project, check out the SoR Member Pages. If you make anything neat with the Axon, or want others to see your work, send me a heads up and I'll post your project on the Axon Examples.
Society of Robots copyright 2005-2014