
 Search Here
MISC
Parts List
Robot Forum
Chat
Member Pages
Axon MCU
Robot Books
Shop
Contact
SKILLS
How To Build
A Robot
Tutorial
Calculators
Mechanics
Programming
Miscellaneous
Robots
Space
HARDWARE
Actuators
Batteries
Electronics
Materials
Microcontrollers
Sensors
SCIENCE
Robot Journals
Robot Theory
Conferences
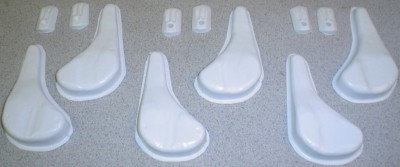
Vacuum forming has almost never been used in robotics, mainly because most roboticists are not familiar with the process. In the design industry, vacuum forming is one of the most common methods of rapid prototyping, simply because it is very fast, cheap and easy to do. It's also commonly used to package your cool action figure toys that you buy from the store. What many are not aware of is that with vacuum forming is great for mass production (shown above) of robot parts with little effort. An affordable swarm of colony robots, anyone? To see an example of a robot made from vacuum forming, visit my page on the Jesus Lizard Robot.
The general process of vacuum forming is to make a mold, place a sheet of thermal plastic over it, heat it up, and suck it over the mold. And your done!
Before continuing to read, there is one problem with vacuum forming . . . you need a vacuum form machine. There are three ways to get one. Go online and buy a $6000 industrial vacuum form machine (check the ad window on the top right of this page). Figure out how to make your own for about $500 (search the web for plans). Or beg someone in the design department at your university to let you use it. Actually using the machine however is extremely cheap. You can probably make between 5-100 parts for under a $1, depending on part size and complexity.
Ok there is actually one other way to get a vacuum form machine. The dental industry uses them to make stuff for your teeth. These machines can be bought from any dental distributor online. They are fairly cheap, can make strong forms, and range from $300-$500. The catch however is that every single one available, no matter the manufacturer, has a working area of only 5"x5". Believe me, I checked. So unless you only want to make small parts, they wont be very useful.
Ok I got my machine, now what?
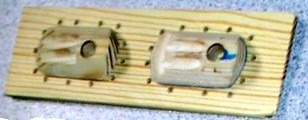
Now you need to make a mold. Find a block of wood that you can easily carve, such as
balsawood, about the size of the part you want to make.
Or carve and shell a block of foam core.
Remember that vacuum formed parts are normally flexible, so make sure your part has a stiff strong
shape. Rounding edges, making use of stylistic curves, and adding ridges can all make your
part stronger. Now glue your wooden mold flat onto a thin sheet of wood. Drill a few holes
through the wood sheet around your part with about an inch spacing. This is so that the vacuum is
insured to suck around your part tightly.
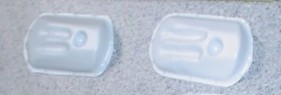
Now get your sheet of styrene and heat it up with the vacuum form machine. Note that there are several types of sheets to choose from. First you must choose a thickness. Thicker sheets are stronger and more rigid, but also heavier and harder to vacuum form properly. Thinner sheets are lighter but more flexible and more likely to crack, but usually are easier to vacuum form. The other choice to make is color. There is the transparent (shown below) kind which lets you see the insides of your robot. There is also the opaque kind which lets you have any color you want, white being the most available. But the opaque kind has a much higher tendency to crack, so I only use it for looks.
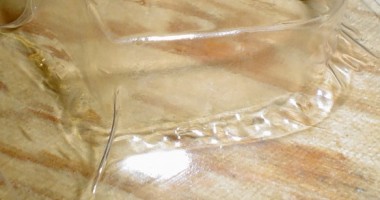
After your sheet is well heated, place it over your part, turn on the vacuum, and wait a few seconds. Make sure the vacuumed styrene is flush with the edges of your part. If not, you probably have what is called webbing (shown in the above image). After done, pull the styrene away from your mold. This can actually be a little difficult, depending on your shape and how deep it is. Take your time as you might accidently crack it.
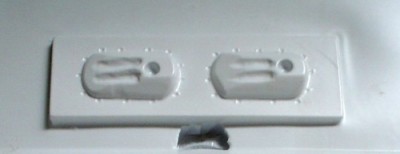
Now that it is pulled, cut the parts out with scissors. If you want to connect two parts together, make sure you leave a little flange remaining. To bond multiple vacuum formed parts together, buy some Plastiweld. This stuff bonds styrene at the molecular level so it forms a good airtight/watertight seal. If you crack a piece during your pull, you can repair it with this stuff. Superglue is also great for bonding it to non-styrene parts.
Now you have a vacuum formed robot foot or whatever you wanted to make.

Other uses for Vacuumforming
Great for waterproofed robot chassis
Low strength, but can easily be made into high strength shapes
Package (like for toy action figures)
Can be made in any color, such as red! Red robots are cool, transparent too
Can be made into almost ANY shape, like a Ferrari shape or something
Great for rapid prototype
After making a mold, you can batch make hundreds of parts within minutes
Extremely cheap, pennies per part made . . . but the vacuumform machine can be a little expensive
Disadvantages
Requires an expensive vacuumform machine, although they can be homemade for under $500
Making a mold can take several hours
Society of Robots copyright 2005-2014