
 Search Here
MISC
Parts List
Robot Forum
Chat
Member Pages
Axon MCU
Robot Books
Shop
Contact
SKILLS
How To Build
A Robot
Tutorial
Calculators
Mechanics
Programming
Miscellaneous
Robots
Space
HARDWARE
Actuators
Batteries
Electronics
Materials
Microcontrollers
Sensors
SCIENCE
Robot Journals
Robot Theory
Conferences
- Flip the on/off switch on the power strip by the red tool stand (next to CNC machine)
- Press 'Power On' (green button) on CNC machine
- Press 'Reset' then 'Zero Ret' then 'All Axes' (use 'Hand Jog' and set tolerance (buttons to right))
- Get a couple sheets of sacrifice material to place under part material (same size and type)
- Place materials in machine
- Get clamps from red toolbox drawer and clamp material down on all corners
- Press 'List Prog'
- Turn scroll wheel to highlight 'ALL' under program list
- Press 'Select Prog' then 'Receive RS232'
- Open NCNet_Lite on computer
- Click 'Start' then click green hand (upper left) then click computer w/ blue arrow (upper middle)
- Find *part*.txt file and open
- Turn scroll wheel to highlight newly loaded file
- Press 'Select Prog' then 'Mem'
- Get the bits needed for machine
- Get bit holders from the 'Tool Holders' drawer
- Tighten bits onto bit holders using benchtop vice grip and wrench (face bit to back of table)
- Spray top of bit holders with grease and coat evenly
- Press 'MDI DNC'
- Hold tool up to mill opening while pressing black button on mill (will suck the tool into place)
- Press 'ATC Fwd' to get to next tool space
- sRepeat last 3 steps until all tools in place
- Press 'Hand Jog' and move X and Y coordinates somewhere near corner of material
- Move Z coordinate to the material surface (use tissue paper to judge when touching)
- Press 'Offset' then 'Tool Offset Measure' for Z coordinate
- Press 'MDI DNC' then 'ATC Fwd' or 'ATC Rev' to get to next tool
- Repeat last 3 steps until all tools zeroed for Z coordinate
- Press 'Hand Jog' and move X and Y coordinates to zero position (corner of part to be made)
- Press 'Offset' twice then 'Part Zero Set' for X and Y coordinates
- Attach coolant nozzle (from drawer) to mill
- Open valve on coolant nozzle
- Press 'MDI DNC' then 'Coolant' to start the flow and test
- Adjust direction of nozzle as needed
- Press 'List Prog' then 'Select' then 'Mem' then 'Current Cmds'
- Press '25% Rapid' to start at a slower rate (make sure program does what it is supposed to)
- Press start button (green)
- Pay attention to the load percentage on mill (should never go over 18%)
- Keep close watch and be ready to either open mill door or press red stop button
- Unclamp materials and use air hose to spray off coolants and debris in machine
- Place sacrifice materials in box with other materials
- Air spray off clamps and return to toolbox
- Air spray bit and remove pressing 'MDI DNC' then 'ATC Fwd' or 'ATC Rev' to advance bits then holding bits while pressing black button on mill to release
- Take bits out of bit holders using vice grip and wrench (face bit to front of table)
- Use coolant to wash off inside on CNC machine
- Use air hose to spray off coolant inside CNC machine
- Press 'Power Off' (red button) on CNC machine
- Flip on/off switch on power strip by red toolbox (next to CNC machine)
- Shovel out debris underneath CNC into basket
- Close software on computer
- Spindle Warm-Up: If machine has been off for an extended period, a message will appear saying to run the spindle warm-up program. This program is found using the 'List Prog' button and loading just like the tutorial above.
- Slow/Stopped Coolant Flow: First check the plastic nozzle pipes you attached. Blow air hose through them. If this doesn't work, clean debris out of coolant basin underneath the CNC machine. Make sure no debris is blocking pump intake from basin. If this doesn't work, pump may have to be cleaned out. Behind the CNC machine is the pump. Unscrew the hose to the top of the pump and blow air through it. Pull out pump and make sure nothing is jammed inside. Replace pump and screw hose back on.
- Weak Air Hose Flow: Could be the compressed air pump. Check pressure level on pump in room to left of CNC machine room (walk out door to right). Get help with this.
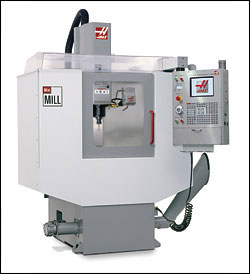
I used a Haas CNC to manufacture parts for many of my robots. Basically a roboticized mill that can be programmed to cut out parts made in CAD. I know you want one, but they cost like $100k to purchase and operate. Want one cheap? Its been asked a million times in the forum, just search!
Because I don't expect the overwhelming majority of my readers to ever use a CNC, this tutorial has been left sparse.
Videos
A few videos of it in use. Unforunately I cannot show you me using the machine, because I am not allowed
to film on a secure Naval facility. Instead, I grabbed a few vids I found on youtube:
Tutorial
These are basic notes on operating the
Hass CNC Mill taken by an 'apprentice'
of mine while showing him how to use it. I will not be further elaborating on them, or teacing G-code,
so this is mostly a notes dump. Sorry!
Oh and btw, we use EdgeCAM to develop the G-code for the toolpaths.
Setting Up Machine
Raw Material Placement
Loading Part Files
Inserting Mill/Drill Bits Into Machine
Zeroing Bit Location
Coolant Setup
Start Program
Clean Up
Other Notes
Society of Robots copyright 2005-2014