
 Search Here
MISC
Parts List
Robot Forum
Chat
Member Pages
Axon MCU
Robot Books
Shop
Contact
SKILLS
How To Build
A Robot
Tutorial
Calculators
Mechanics
Programming
Miscellaneous
Robots
Space
HARDWARE
Actuators
Batteries
Electronics
Materials
Microcontrollers
Sensors
SCIENCE
Robot Journals
Robot Theory
Conferences
The Original Taurus
Taurus was my very first robot, named so as it was planned to follow anything the color red.
But being my first robot, built in early 2002 as a sophomore, it was an absolute failure.
And so a year later, in late 2003, I decided to redo it - knowing everything I learned from building several
other robots in between. Also, you may note that the wheel kinematics are similar to the Mars rovers.
I must emphasize - I built this robot before ever being aware of the rover design!
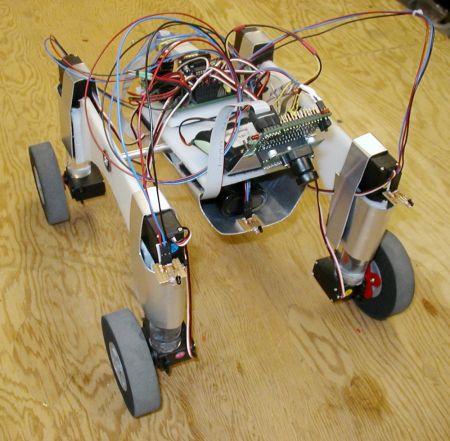
Taurus 2 Mechanical Features
Has a zero degree turning radius (can rotate in place). It has near omni-directional movement,
minus singularities at maximum servo rotations and the time it takes to turn a wheel. This
allows Taurus 2 to travel sideways, forwards, straff, and even drive in sinusoidal shapes - yet
still face in the same direction. And lastly, it can handle rough terrain.
Here is a composite video of T2:
( music by
Zox - Canon
)
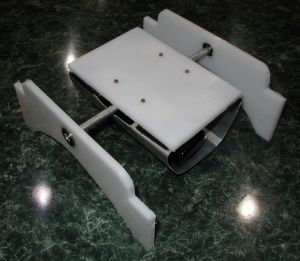
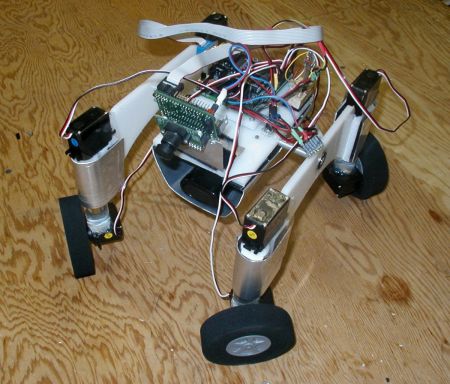
Mechanical Design
T2 was made in 2D CAD (my first time using CAD) and built using HDPE and
aluminum as the chassis material. A long metal rod
attached to two ball bearings created the rocker-bogey system, as shown in this
assembly picture:
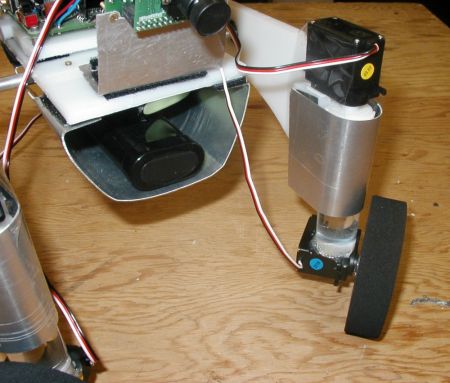
Electrical Design
I used a PIC based microcontroller programmed in C.
Eight digital outputs controlled each of the servos independently, while the CMUcam was interfaced
by the serial port. The eight servos drained large amounts of power, so I had to use two
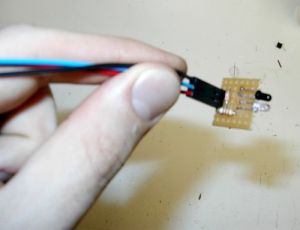
NiCad battery packs. As additional contactless 'bumper' sensors I made three
infrared emitter detector sensors,
as shown here:
Programming and Control
I programmed T2 to read in the middle mass (centroid of a color in an image) of the colors green and blue in whatever
it saw from the camera. I then would have the servos rotate in such a way so that T2 would always drive to that
middle mass. I wanted T2 to follow a white line, and so this worked really well. To control
four wheels independently, you must have each wheel turn to a specific angle so that the axis
of each wheel goes to a single central point (or axis of rotation). This image will explain it well:
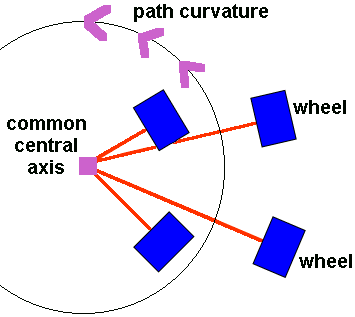
If the front two wheels had equal angles, the rotation axis will not be common, and you will have high friction and skidding. If the wheels were to never change the angles as shown in the above image, the robot would follow the imaginary circle perfectly about the common central axis. Just use basic trigonometry, knowing the turn radius and wheel locations, to determine required wheel angles.
When I programmed it, I made a continuous fuzzy logic algorithm to relate wheel angles to target direction. The front wheels and back wheels were inverted so I just needed to do two angle calculations per cycle. I also did a few mixes of other algorithms, as seen in the above video. Another method is to make a trigonometric lookup table to control wheel angles.
This is the wheels positioned so that T2 can rotate in place:
And one more closeup image:
Parts Used
The total cost to me to build the entire robot was about ~$90, with many
parts being scrapped from
a few of my older robots. Here is a list of parts and typical prices of everything used:
(2) 7.2V nicad battery packs ($16)
(1) CMUcam ($100)
(1) Cerebellum Microcontroller, by Botrics ($40)
(3) homemade IR (~$4 in components)
(8) HS-311 servos ($71)
(1) null modem cable ($3)
(4) foam 4 inch diameter model aircraft wheels ($15)
(1) 1'x1' sheet of HDPE ($10)
(2) ball bearings (found in a scrap pile)
(1) 1'x1' sheet of aluminum ($10)
Make Money by Making Robots
Building Taurus didnt actual cost me anything, as not only was the cost paid for by a grant
that I applied to (with extra $$ left over), I also entered this robot into the 2004
CMU MOBOT competition - winning 3rd place
and $250.

Dont Use the CMUcam!
I grumble that I didnt place 2nd that year. Apparently the CMUcam has a not very well known bug,
causing the firmware to crash when getting large amounts of blue light - such as from the sun.
I couldnt figure out why it would just stop working, until 2 years later when looking at the CMUcam
output in sunlight in detail.
The developers have never fixed this problem and have no plans to. Dont believe me? Point it at the sun
during a sunny day and watch it stop working! (rant rant grumble grumble)
Source Code:
PIC 16F877 source code for Taurus2
note: I can't seem to find my most updated code, so this is take it as it is.
Society of Robots copyright 2005-2014