go away spammer

Author Topic: Servomotor .hex file  (Read 18387 times)

0 Members and 1 Guest are viewing this topic.

Offline Nate_the_GreatTopic starter

  • Jr. Member
  • **
  • Posts: 15
  • Helpful? 0
Servomotor .hex file
« on: August 08, 2007, 10:57:22 AM »
The .hex file that is used to center the servos, do I need to input it as the source file, and then add the header file and makefile from the $50 robot?

"Next we need to center the servo. Do this by plugging it in to your controller and send the signal required for it to go to 0 degrees. You should probably see the gears rotating without stopping. Now rotate the pot head (no, not that type of pot head) so that the gears stop rotating. It will probably be very sensitive so take your time. It is very important for this to be perfect. Get some superglue and glue the pot head to make sure it remains in place."

I would really like to just do it without the .hex file and in the tutorial it is mentioned that it can be done by hand, but in this step it sounds like I have to use the file so that I can rotate the pot head until the gears stop rotating?

Can anybody help me? ???

Offline HDL_CinC_Dragon

  • Supreme Robot
  • *****
  • Posts: 1,261
  • Helpful? 5
Re: Servomotor .hex file
« Reply #1 on: August 08, 2007, 01:09:31 PM »
Ok heres what you have to do:

1) Take off the servo horn (the big round white thing should be on there by default)
2) Unscrew all 4 screws from the back of your servo
3) Remove the top of the servos case (the part on the side where you can see the small geared shaft sticking up) *Make sure not to let any of the gears fly out at you
4) Remove the main gear(the biggest one opposite of the one that also has that small geared shaft which will actually require you to remove 2 other things first. Youll see when you get in there) *Make sure that when you take them out, you put them on a very clean surface so that they gear grease doesnt get dirty or washed off.
5) Plug your servo into your robots mother board like you normally would
6) Load up your project in AVR Studio
7) Click on the "Connect to the selected AVR Programmer" button. It looks like a little black IC with the white letters "AVR" on it. It should be 2 bars below the Help menu button and to the right...
8) When the window pops up, go down to where it says "Input HEX File" under "Flash" and click the little button labeled "..."
9) Select the HEX file that you should have downloaded for zeroing or centering the servo and click "OK"
10) Click "Program"
*Your gears should now start rotating in the servo
11) You should see a little raised structure in the servo coming out of from where you took the main gear off, this is the Potentiometer(pot) head. Slowly start to turn this in either direction until you see the gears stop moving. It should not take much force at all to turn the servo so be careful not to break it.
12) When you see that your servos gears stop completely, apply super glue carefully to the pot head. Make sure you dont turn the pot head at ALL or you could throw off the calibration (I did this a few times lol)
13) Also, make sure that you dont get super glue anywhere but on the potentiometer and the plastic just around the potentiometer to keep it from moving at all.
14) Now you will probably have to modify the the main gear. You should see a small "block" protruding from the shaft of this main gear, cut that off.

15) On the underside, you should see a notch that sat on top of the pot head. If you got lucky, you should just be able to remove some sort of catch system like this

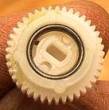
If not, you need to dremel it out BUT BE CAREFUL NOT TO MESS UP THE GEARS ON THE OUTSIDE!
I regret not having taken pictures of when I did it.
Just make sure that there is enough room for the gear to spin without interfering(touching at all) with the pot.

16) Wait for the glue to dry (wait like a half hour to an hour just to be safe) and then put the main gear back in and gently try to spin it a little bit to make sure its not catching on the dried glue or anything
17) Put it back together and put the screws in
18) Enjoy!


Post if there are any problems with any step
« Last Edit: August 08, 2007, 01:16:58 PM by HDL_CinC_Dragon »
United States Marine Corps
Infantry
Returns to society: 2014JAN11

Offline Nate_the_GreatTopic starter

  • Jr. Member
  • **
  • Posts: 15
  • Helpful? 0
Re: Servomotor .hex file
« Reply #2 on: August 08, 2007, 07:17:53 PM »
Ok, I'll be a little more particular, I'm modifying an HS-225MG, and I opened it up, took out the metal stop n stuff, but I didn't load the .hex file to send the servos to zero. It says to superglue the pot on the inside, but I just left it as close to zero as I could and closed it up. It seems to work now, but it just makes this noise, like it's skipping or something,

What's with the little pot and what happens if you don't glue it? ???

Can I get it in the proper position without the .hex file (by hand) ? ???

Offline HDL_CinC_Dragon

  • Supreme Robot
  • *****
  • Posts: 1,261
  • Helpful? 5
Re: Servomotor .hex file
« Reply #3 on: August 08, 2007, 09:18:26 PM »
Unfortunately nate, thats probably not possible. You need to be able to monitor when the pots telling the circuit its at zero degrees.

About the clicking sound:
Did you make sure to clip off the little stopper block shown on the left side of the gear in the picture in step 14 in my previous post? Thats important to do

About the super gluing of the pot:
Its important so that when your robot gets bumped, the potentiometer doesn't adjust at all. If it does adjust(which like I said in my previous post, it really doesnt take much force at all to adjust it) your entire drive system will be thrown off and your bot will do some crazy(bad) things

Summary:
I suggest opening it back up and making sure that you cut the little stop off and that you have accurately zeroed the potentiometer and glued it. That is very important also. Its better to do it now instead of wondering why your robot doesn't drive correctly later down the road. Also, make sure then when you power up your circuit, your using the same power source that your going to use when you complete the robot and use what it will normally run on. That way, you know that the potentiometer is calibrated to the right amperage and voltage.

I used a 5.15v 40mA power source to calibrate my servos yet my robot is going to be powered by a 6v 1400mAh power source when its finished. That means that im going to need to un super glue (>_<) the pot and recalibrate it to the right voltage and current. Dont make the same mistake I did ;)

To program it, you should be able to follow the steps I posted above, just omit the parts you dont need =)

Post if you have any troubles.
United States Marine Corps
Infantry
Returns to society: 2014JAN11

Offline Nate_the_GreatTopic starter

  • Jr. Member
  • **
  • Posts: 15
  • Helpful? 0
Re: Servomotor .hex file
« Reply #4 on: August 10, 2007, 11:38:56 AM »
Awesome Dragon, Solved the problem, Servos are woring alot better and was able to get the hold_servo.hex file working!  ;D

Ur almost as good as Admin  ;)

Thanks!

Offline HDL_CinC_Dragon

  • Supreme Robot
  • *****
  • Posts: 1,261
  • Helpful? 5
Re: Servomotor .hex file
« Reply #5 on: August 10, 2007, 02:27:54 PM »
Hahaha no problem Nate =) My pleasure to help =)


Im only as good as admin on topics that I actually know what im talking about such as modding the servos and calibrating them  ;) :P
United States Marine Corps
Infantry
Returns to society: 2014JAN11


Get Your Ad Here