
 Search Here
MISC
Parts List
Robot Forum
Chat
Member Pages
Axon MCU
Robot Books
Shop
Contact
SKILLS
How To Build
A Robot
Tutorial
Calculators
Mechanics
Programming
Miscellaneous
Robots
Space
HARDWARE
Actuators
Batteries
Electronics
Materials
Microcontrollers
Sensors
SCIENCE
Robot Journals
Robot Theory
Conferences
=== Cell Phone Transmitter ===

Introduction to Cell Phone Transceivers for Space
Phones are getting more and more advanced every day. They now have GPS, can run homebrew software,
and a rare few even have the ability to interface with various external sensors.
So with all these features, why can't they just text message GPS coordinates for you to track in real time? They even have cameras to film everything. So why not just send a cell phone to space?
And actually, people have tried it. With some success.
But the main technical limitation, and the one that will forever trump all pros, is the range. What exactly is the range? Are there any other negatives? This is what I wanted to find out by running this experiment on the latest balloon flight to space.
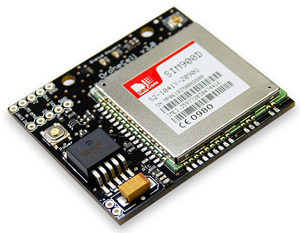
For this experiment, I used the DroneCell cell phone transceiver (donated to us; shown below). This device has the ability to connect to a microcontroller and then send text messages as programmed. It also has a built in Lithium battery charger - great if you plan to attach solar panels to your balloon (which we did). The cheapest phone plan I could find at the time was one month of unlimited T-Mobile texting. The device sent over 300 text messages over the course of testing and the actual launch.
Benefits
Lets go over the pros, first.
When sending something to space, it's crazy to not have a backup transceiver to relay GPS coordinates. This system served as a Plan C in case the first two failed.
It also has a high bandwidth, meaning I can send large chunks of neat data. It's neat that I can find out the temperature or maximum altitude or other experimental results while it's still in the air. I could, in theory, even use it to send complimented commands to the balloon by phone.
This below image shows a text message I got from the balloon:
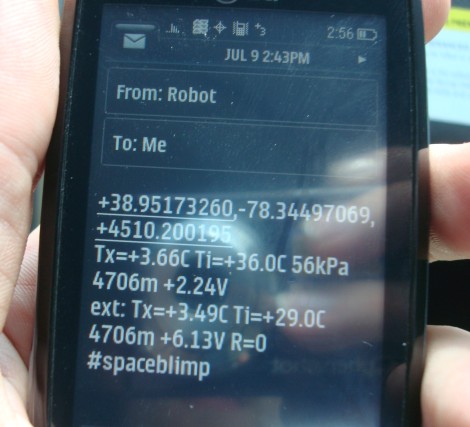
The first group of three numbers is GPS coordinates. Tx is external temperature, Ti is internal temperature, followed by altitude (meters), and solar panel voltage (volts). The next group of numbers (ext) was the most extreme values so far measured (useful for knowing records).
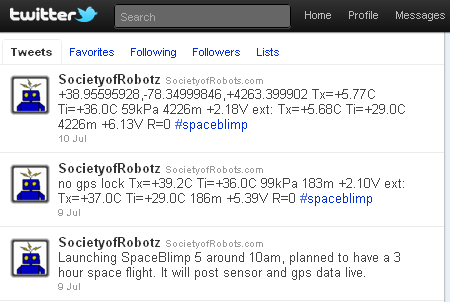
Given that it sends text messages, one can set it up to use a service by Twitter so that its text messages are posted in real time to the internet. Here are a few messages it sent from several thousand feet up:
Disadvantages
The range is absolutely terrible (relatively speaking). Cell phones require cell phone towers. As long as there is a tower within range,
you're fine. But often times you fly it out - or it lands out - in the middle of nowhere, on some farm or mountain range where cell phone
towers don't reach. It also has issues with altitude - cell phone towers are designed to have horizontal range but not vertical range.
As such, cell phone reception is near dead within 10-15 minutes of the flight.
Anyway, I took the liberty to plot cell-phone reception for the duration of the flight with respect to altitude (based on pressure, not GPS).

By looking at the data, you'll see reception was dead for the majority of the flight. As such cell phones are a poor choice for tracking blimps, although it'd be an acceptable backup to help you recover the balloon if the primary tracker fails.
note: There is an interesting blip of data at 19km. I'm not entirely sure how cell phone reception was picked up at that point, but it'd be interesting to see if it happens again in a future flight.
Wiring it Up
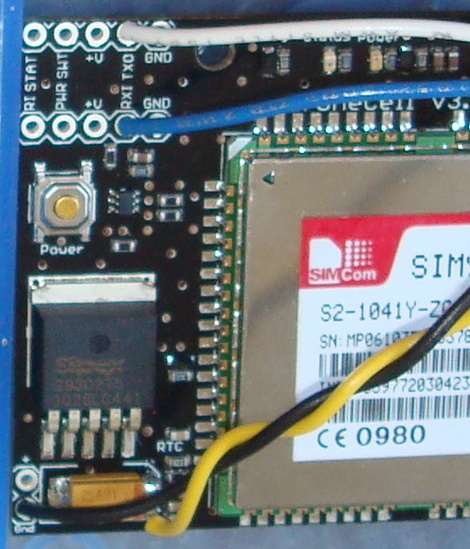
For simple communication the wiring was easy. I attached my power source to the power and ground connections.
And then I hooked up Tx and Rx to the UART of my Axon Mote
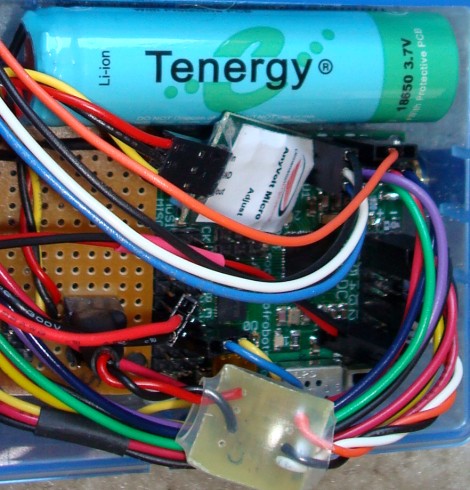
as shown in the below image:
The DroneCell strictly needs between a 3.4V to 4.5V (unregulated) power source, and can draw up to 2A instantaneous current during transmit, meaning a 3.7V lithium battery is ideal. I used a Tenergy 18650 Lithium 3.7V 2600mAh battery with a built-in protection circuit. The circuit is important in that it prevents the battery from getting damaged by either over draining or overcharging. It is also a single cell battery so I do not need a load balancer circuit. As such, I can carelessly hook up an unpredictable power source to it for charging (such as a solar panel).
The below image is the battery charging diagram for the Drone Cell that I used to charge my battery by solar panel. My solar panel + connected to Vchg, the battery + to Vbat, and I left TEMP_BAT disconnected (it's optional).
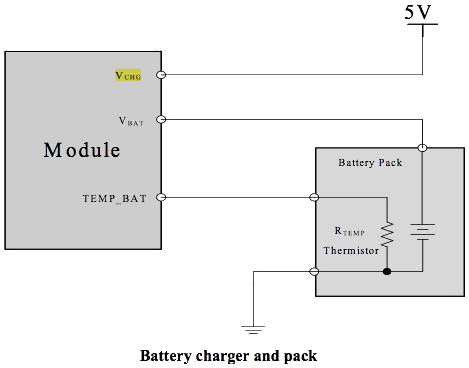
If you would like to learn more about charging batteries using solar panels, please see my Solar Panel tutorial.
Society of Robots copyright 2005-2014