
 Search Here
MISC
Parts List
Robot Forum
Chat
Member Pages
Axon MCU
Robot Books
Shop
Contact
SKILLS
How To Build
A Robot
Tutorial
Calculators
Mechanics
Programming
Miscellaneous
Robots
Space
HARDWARE
Actuators
Batteries
Electronics
Materials
Microcontrollers
Sensors
SCIENCE
Robot Journals
Robot Theory
Conferences
= Simulations, Modeling, Mapping =
Intro to Simulations, Modeling, and Mapping for Balloons
Before we even begin, if you've never used software simulators before, I strongly encourage you
to first read my tutorial on finite element analysis. It will explain
to you all the caveats about using software simulators. Links to more software can be found on the
external links page.
Predicting the Weather
I can't emphasize how important launch planning is. The very first step is to have a look at the jet stream.
There are various websites out there, but the one I recommend the most is this animated version:
ANIMATION of Jet Stream Forecasts
(click Build Animation to see it in motion)
They also have a jet stream animation of the northern hemisphere in case you live somewhere other than north America.
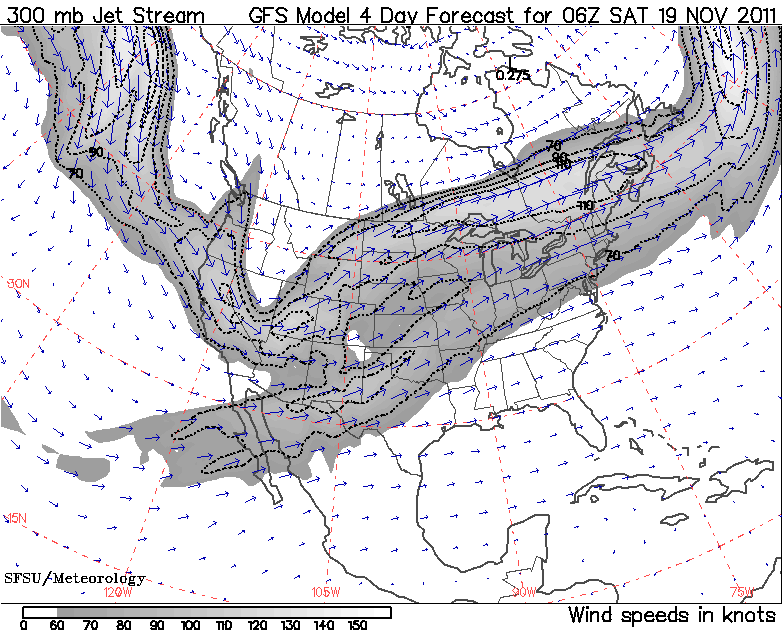
image: example of jet stream mapping
The arrows represent wind speed and direction. Ideally you'd want to launch when you expect the arrows to be really small. If you choose the launch date poorly, you could end up with 150mph winds blowing your project 300 miles away (that means a 600 mile drive there and back). Or worse, if you live on the east coast, your project will land in the Atlantic Ocean. The jet stream is seasonal and typically calmer during the summer.
note: On the flip side, some people intentionally try to fly their balloons across the Atlantic to Europe - so the jet stream isn't always a bad thing!
Weather Soundings Data
Wind speeds and directions can vary greatly with altitude. Knowing your general launch region in mind,
you now need to get exact wind speed data from what's called 'sonar soundings'. Typically it's paid for with your tax
dollars and useful for various industries - yet free for you to do whatever with it.
One place to get sounding data is here:
http://weather.uwyo.edu/upperair/sounding.html
Click the location on the map, and it'll give you a chart of data which you can play around with.
If you google around you can find several sites offering sounding data in various formats.
The sonar soundings will consist of a chart listing things like temperature, pressure, wind speed, and humidity at various altitudes. This info can not only help you prepare for insulation and testing and to verify post-flight data, but also support running flight trajectory prediction simulations. I encourage you to plot that data in Excel to better visualize the atmosphere.
Predicting Rain
You can also plan for rain. Launching in the rain is bad for obvious reasons.
Launching with winds above 10mph is bad as the balloon is hard to control during inflation.
And 100% cloud cover makes pictures from your cameras rather boring.
Now, don't just go to some weather site and read the prediction for that day. It'll say something useless like 'Wednesday Rain 60% chance', and then there won't be a single cloud in the sky the whole day. What you need to do is think like a weatherman and learn how to read satellite maps.
To plan for rainy weather, I use this animated map from Wunderground. You can zoom to individual locations, and track cloud movement over a period of days. Click the animation triangle button and watch how the clouds form, the directions they move, and the distance it travels over a set period of time. With a little practice, you can predict rain with fairly high accuracy. It also has a future weather prediction option on the map, but I haven't verified if it's accurate or not.
The weather soundings data will help you guestimate the cloud direction and wind intensity for that day, too.
note: Our team typically sets a launch date weeks in advance, but doesn't 100% confirm the launch date until a day or two before. If the weather is bad, we just shift it to our second 'rain date' (already decided in advance).
Simulations
Before I go any further, keep in mind that simulations ARE NOT an exact science. They are fairly crude and can be inaccurate by large percentages.
If you input bad data, it'll output incorrect results. Garbage in garbage out.
To simulate, you need to input the weather of the launch date - but how do you know the weather of the future? We typically run simulations 2 or 3 days before to determine a launch location and plan logistics. We then run another the night before to confirm the launch location, and yet again early morning before driving out to the planned launch site. We have had times where we were forced to make last minute changes.
Each simulation uses the latest predictions of weather, with accuracy increasing as the launch date becomes nearer. It's also fun to run a simulation after recovery using actual weather data to see how accurate the simulator really was. Typically a simulation can determine where it'll land within a ~15 mile radius.
After looking up the jet stream and deciding which day is best to fly, choose a launch region based on the wind direction and speed. This will help you with the next steps later in this tutorial. The best way to do this would be to open up google maps and look within a 50 mile radius of where you live/work. We'll be coming back to this later to choose a more specific location.
Simulating the Balloon and Parachute Vertical Speeds
The first part of your flight involves the balloon going up. But how fast does it go up? If it's in the jet stream for a long time,
where winds are very fast, your balloon will travel very far (a bad thing).
ascent
-
How high does the balloon go before it pops?
If you fill the balloon with too little helium, it'll go up too slow and not very high. Worst case, it might even become
neutrally buoyant at too low of an altitude and simply not burst at all. If you fill it too much it'll go up very fast,
but it'll also pop faster because of increased expansion of the helium. So given your goals of altitude and such, you need to decide how much air to use.
Use this Balloon Burst Calculator or this CUSF Balloon Burst Calculator. Measure exactly how much your balloon package weighs. Even small errors can add up in a simulator! A general rule of thumb is that you want about 4 to 5 pounds of positive lift (PPL).
note: here is another ascent rate calculator
Remember to rerun your calculation using the exact measured lift on launch day.
descent
-
After your balloon pops your package will start falling. It will fall through the jet stream, and the slower it falls, the farther it'll blow
with the wind. The descent rate depends on the weight of your package and the design/size/shape of your parachute. There are various
parachute descent calculators
out there. Choose the one that best fits your parachute design for highest accuracy. Be aware that the material porosity (a property that is
difficult to experimentally measure) and air pressure for that particular day affects results.
If you want really high accuracy, copy the exact design of a parachute and package weight that has flown before, and then look at the actual descent data of that parachute.
Simulations will help you design your chute to be sufficient, but actual experimental tests are the only way to get an exact descent rate. You can find a very tall building and throw your package off the roof. Film it to measure descent rate. But keep in mind that descent rate changes with air pressure - there is no air at high altitudes to fill your parachute! This below video was made when we questioned the logic of using a dual parachute system - would two parachutes get tangled up or naturally separate?
The video shows that a dual parachute system works great. The weight (schoolbag with stuff inside) was about 4 lbs. It was hand-thrown in front of the parachute. Unfortunately that was the tallest building I had roof access (without risking arrest!). At the end of the video it was more of a blooper reel. But it shows what happens when the weight is launched upside down, i.e. it still works.
note: Another person on our HacDC team hand-made those two parachutes.
Balloon Trajectory Simulation
Now it's time to start simulating.
To help visualize how the simulator works, picture wind speed being zero at all times. Your balloon will go up and then fall back down - 100% vertically. Given your previously calculated ascent and descent rates, your balloon will spend different amounts of time at different altitudes. The wind conditions are different at each altitude, as listed by the sounding data. As such, your balloon will move horizontally at those speeds and directions for that set period of time at that set altitude. It's simple math, but involves a large number of repetitive calculations. A simulator does all that math and spits out a predicted trajectory. Overlay that trajectory on a map and you have a predicted landing location.
Remember: garbage in garbage out. Give it good data, and it'll give you an accurate trajectory.
Let's start with a simple simulator: Balloon Trajectory Forecaster
Type in the balloon pop altitude and exactly where you plan to launch it (get GPS coordinates from Google maps). This simulator does not account for your specific ascent/descent rates, but it should give you a general idea of what to expect.
It will output the result as a GoogleEarth KML file. Just open that up in Google Earth and play around with the trajectory to get an intuitive feel for it.
For a more fancy (but also more complicated to use) simulator, there is Balloon Track. If anyone knows of a better simulator, or wants to link a tutorial on any other simulators, contact me. But DO NOT email me on how to use it. Ask all your questions in the forum.
Choosing the Launch Location
Now that you have the predicted balloon trajectory, look at your Google map and find an exact location to launch from.
Any place within a ~50 mile radius of your simulated launch location will result in the same general trajectory.
A public field with no trees to snag your balloon is good. The trajectory should follow major highways (not back roads)
so you can easily follow the balloon. The trajectory should not cross over lakes, rivers, mountains, airports, restricted air spaces
(like the White House, or military bases), etc. And finally, the expected landing region should be near a major road that goes straight home.
It's not easy! Your team is likely to spend hours debating on the 'perfect' launch location. But I'd argue this is a good thing - if a later simulation result forces a change in launch location, everyone would already be aware of the issues making re-planning rather quick and painless.
After you've decided on your launch location, run one more simulation using the new coordinates to verify the trajectory.
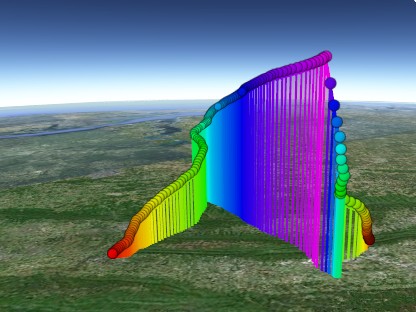
The below video shows a balloon trajectory recorded from one of our balloon flights.
Notice that the path the balloon takes to go up is nearly the mirror image of the path the balloon takes when coming back down. The only difference is that the rate of falling was 2x that of rising. You can use this knowledge to predict the final landing location during mid-flight.
note: large features such as mountains could distort the predicted landing location
More simulation software can be found on the additional links page.
Plotting the Final Trajectory
Just like when you plotted the simulated path, you can also plot the actual path from the logged GPS coordinates.
To convert your GPS data to a Google Earth compatible KML file, use the
GPS Visualizer.
Double click the KML file it gives you and Google Earth will do its magic (see above video for demonstration).
Below are the GPS coordinates plotted in 3D from our last flight, SB5. Use your mouse to scroll around and inspect the trajectory. You need to have the latest version of Google Earth for it to work. If you don't, install it, then refresh this page.
Society of Robots copyright 2005-2014