
 Search Here
MISC
Parts List
Robot Forum
Chat
Member Pages
Axon MCU
Robot Books
Shop
Contact
SKILLS
How To Build
A Robot
Tutorial
Calculators
Mechanics
Programming
Miscellaneous
Robots
Space
HARDWARE
Actuators
Batteries
Electronics
Materials
Microcontrollers
Sensors
SCIENCE
Robot Journals
Robot Theory
Conferences

Installing Software
Part #1: Installing Software
Part #2: Setting up Hardware
Part #3: Using the Bootloader
NOTE: THIS IS THE OLD SETUP INSTRUCTIONS
TO SEE NEW INSTRUCTIONS CLICK HERE.
STEP 1: Install WinAVR
While waiting for your Axon to arrive in your mail, here are several programs you need to download and install to make full use of your Axon microcontroller. Follow the self-explanatory installers.
WinAVR will install the GNU Compiler and a ton of useful utilities.
WinAVR (22.8mb)
You can also download the latest version, but it has not been tested.
![]()
STEP 2: Install AVR Studio
AVR Studio is an IDE, assembler, and programming software all in one. When you want to write and compile code, this is the software you will be using.
(install in this order)
1 AVR Studio, version 4.13, build 528 (73.8mb)
2 AVR Studio 4.13 SP1 (build 557) (37mb)
3 AVR Studio 4.13 SP2 (build 571) (45mb)
Further AVR Studio upgrades (untested by SoR) can be found on the AVR Studio Download page. Or for direct links to download tested upgrades go here. Because AVR Studio is not compatible with Mac or Linux, you might find this post and this post helpful. If you use Vista 64 bit, read this and this. And here are instructions for programming the Axon using Ubuntu.
![]()
STEP 3: Download AVRlib (Optional)
Procyon AVRlib is a "C-Language Function Library for Atmel AVR Processors."
AVRlib has tons of simple to use source code for you to use.
Procyon AVRlib (1.5mb)
You will probably not use it right away, but its good to have available when you need open-source help.
STEP 4: Setup AVR Studio
Now that we have installed all the essential software, lets set up AVR Studio. Find the new AVR Studio 4 icon in your start menu, click, and you should immediately see this window come up:
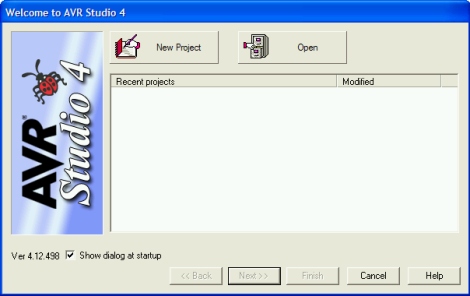
Select 'New Project'
The next window that comes up will look like this:
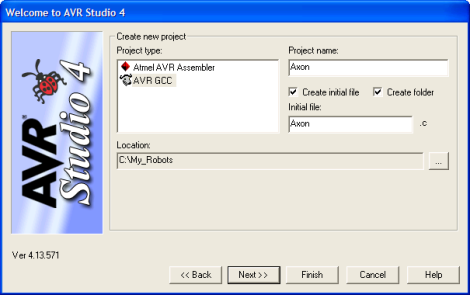
Copy the options that I have chosen, but whatever file name you like.
Make sure there are NO spaces in the file name.
For example, do not do 'C:\Documents and Settings\User\Desktop . . .'
Also, the project file name must be the same name as the initial file. These are 'features' (bugs) in AVR Studio that will cause you problems otherwise!
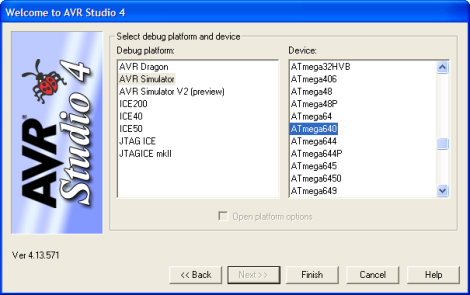
After clicking Next, another window should come up. Select AVR Simulator, and choose ATmega640 on the right. Click Finish.
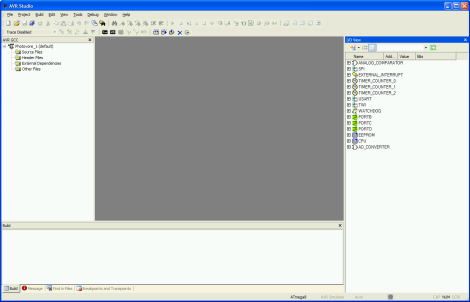
AVR Studio should now load and look something like this:
STEP 5: Download Axon Source Code
The latest Axon code, and instructions on how to use it, can be found at the top of the Axon Function List page.
Unzip all source files into your project folder you just created using AVR Studio.
For example, if your project is called Axon, empty all files into the newly created folder C:\My_Robots\Axon (or wherever it is).
STEP 6: Add Source to Project
Now we need to add in the source code that you downloaded for AVR Studio.
Open up the file Axon.c (from the source code) in notepad, then copy/paste all code contents of it into the .c file with the same name as the project. For example, if your project is called 'Photovore_v1', paste the code into Photovore_v1.c. Push the 'Save' icon at the top left in AVR Studio.
Now, right click 'Source Files' and left click 'Add Existing Source File(s)...'.
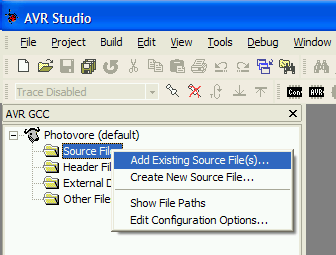
Locate hardware.c and control.c in your folder, and add it. You could also just drag and drop.
Just like with the source files, now right click 'Header Files' and left click 'Add Existing Header File(s)...'. Add SoR_Utils.h. You will probably not modify the other files, so you don't need to bother adding them.
To write your own code, just use the file control.c. By default it's a photovore program to get you started, but you can overwrite anything in that file. The Axon Function List page will explain more.
Note: If you named your project something other than 'Axon', make sure you open up 'makefile' and change TARGET = Axon to TARGET = [your project name].
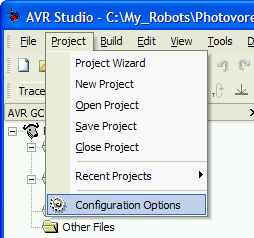
STEP 7: Configure Make File
Now we must set up the options to compile your source code. Go to Project -> Configuration Options.
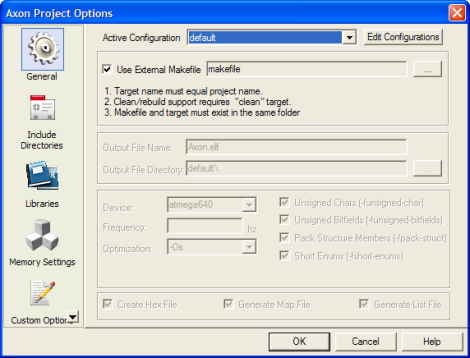
Check the box that says 'Use External Makefile' and then browse to locate the makefile (the file in the downloaded source code labeled 'makefile'). Then push OK.
STEP 8: Compile Code
The final programming step is to compile the code. This converts your code written in C to machine code in a .hex that only your specific microcontroller can read. You should do a Rebuild All the first time you compile the downloaded source code. But after that, if you only make changes to the .c source file, you only need to do the faster Build command.

If all went well, you should see this message after compiling:
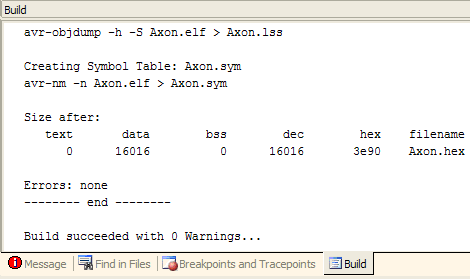
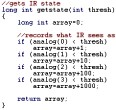
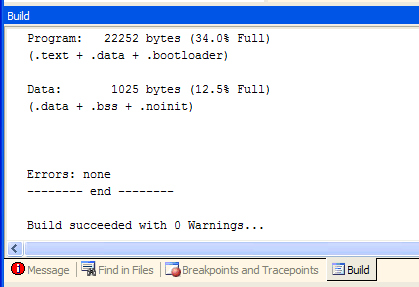
The memory used in this example is 16016, or about 16kb. The Axon can store up to 64kb. If you run out of memory (highly unlikely), just comment out header files that you aren't using in Axon.c. Note: if you run the latest beta software, you will see the improved below message showing exactly how much memory you have used:
If you get errors, and you are new to programming, it may be a little difficult to debug at first. Go back and check to make sure you followed all the steps, especially properly naming the files (a common error).
Note that a new .hex file can be found in your project folder. That is the compiled program. Whenever you modify your program, just click 'Build' and it will recompile a new .hex for you.
Note: A common error you may get is
"gcc plug-in: Error: Object file not found on expected location C:\Documents and Settings\User\My Documents\My_Robots\[your project name]\[your project name].elf
Make sure your makefile specifies the output .elf file as [your project name].elf"
If you get that error, it means you made a mistake naming your files. Start at the beginning, and read instructions more carefully.
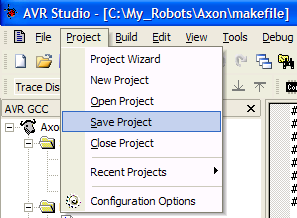
STEP 9: Save Everything
Lastly, save your project configuration.
Now that you are done setting up software, continue to
Part #2: Setting up Hardware >>>
Society of Robots copyright 2005-2014